Nellie Joggers + Shorts Sewalong, Part 3: Waistband Facings
Attach the front waistband facings
Use a seam ripper to carefully open the basted fly seam, revealing the finished fly assembly underneath.


NOTE: In the original pattern instructions, it is instructed to trim the loose zipper end at this time. You actually DON'T have to trim the zipper yet, but make sure that the loose end remains free (avoid sewing it to the waistband, as it will eventually be trimmed down).
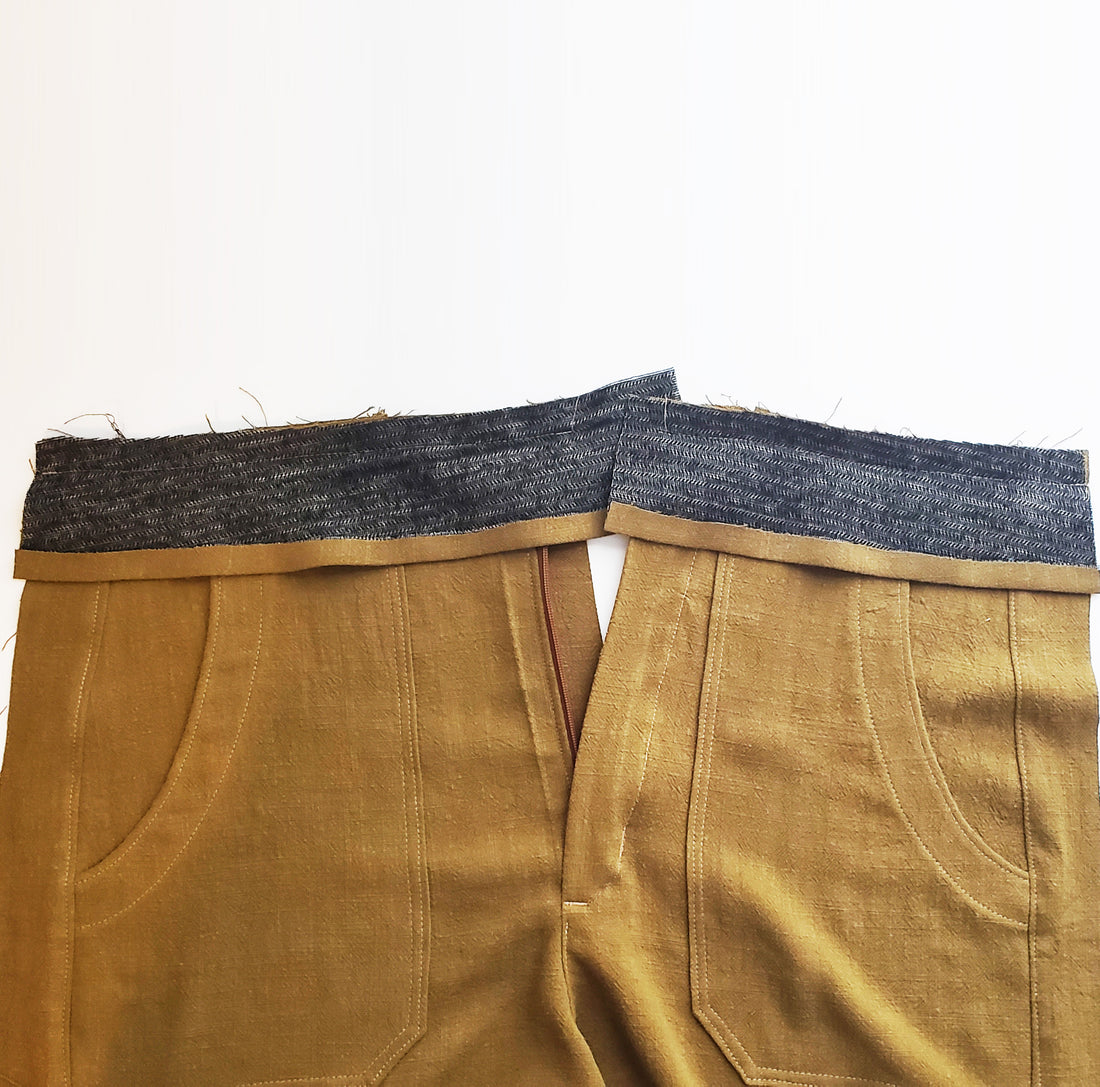
Lay the front leg assembly face up. Align the top of each of the Front Waistband Facings with the corresponding waist of each leg face down/right sides together. The angled ends of the facings will align with the side seam and the straight ends will extend beyond the fly/center front on both sides. The right front facing (when worn) will extend further than the left facing (when worn). Since the assembly is laying face up, facing you, the right facing will be on the left and vice versa.


Sew each facing to each waist with a 5/8" (1.5 cm) seam allowance. Grade the seam allowance to reduce bulk (not shown).

Press the facings away from the waist with the seam allowance pressed toward the facings. Understitch the seam allowance to the facings on each leg (I forgot this step for this sample, but drew a light blue line along the waistband where the understitching should be below). Set aside for now.

Assemble the back legs
Align the Back Legs with one another, right sides together, and sew the back crotch with a 5/8" (1.5 cm) seam allowance. Finish the seam by serging or trimming and zigzag stitching. The finished seam allowance should be about 3/8" (1 cm) wide. Press the seam to the right.


Flip the leg assembly over, right side up, and topstitch the seam allowance down (the topstitching will be on the left side of the seam).

Attach the back waistband facings
Press the bottom edge of the Back Waistband Facing up by 5/8" (1.5 cm).
With the back leg assembly still right side up, lay the Back Waistband Facing face down, right sides together, aligning the top of the facing with the waist and each end with the side seams.

Sew the facing to the waist with a 5/8" (1.5 cm) seam allowance. Grade the seam allowance to reduce bulk.

Press the facing away from the waist with the seam allowance pressed toward the facing. Understitch the seam allowance to the facing (not shown, but the understitching will be in the same location as the front waistband).

Attach the front and back together
Lay the back leg assembly face up and lay the front leg assembly on top face down (right sides together), aligning the side seams/Side Panels of the front with the side seams of the back legs. Also align the waistband ends.


Sew the waistband and leg side seams with a 5/8" (1.5 cm) seam allowance, easing in between notches. Serge or trim and zigzag stitch the seam allowance. The finished seam width should be about 1/4" (6 mm) wide. Press the seam allowances toward the Side Panels.


Press the seam allowance toward the front leg/side panel:


Topstitch the seam allowances to the Side Panels/back waist band 1/16" to 1/8" (2 3 cm) from the edge to secure in place.


Sew the inseam
Align the front inseam with the back inseam, matching the center front and center back seams. Sew them together with a 5/8" (1.5 cm) seam allowance. Finish the seam with your preferred method (serging is recommended) and press the seam toward the back legs.

Finish the front waistband facings
Fold the front waistband facings down to the wrong side of the front leg assembly. The right front facing (when worn) will extend about 1½" (~4 cm) beyond the Fly Shield. The left front facing (when worn) will extend about 5/8" (1.5 cm) beyond the fly. Press the waistband facings, maintaining the 5/8" (1.5 cm) fold you pressed in the bottom edge of the facings.

With the front of the pants facing you, fold the end of the right front waistband facing (when worn) over the top of the Fly Shield and zipper end and press.

Trim the top of the zipper about 1/4" above where you stopped your stitching.

Now tuck the raw end of the waistband into the pocket of space at the top of the fly shield above the zipper, concealing the trimmed 1/4" top of the zipper under the waistband. Press for a neat fold.


Topstitch the pocket of space closed to secure the waistband. Also topstitch the waistband down across the top of the zipper. Your topstitching should also meet the topstitching of the zipper assembly.

Now, fold the end of the left front waistband facing (when worn) to the wrong side by 5/8" (1.5 cm), tucking in the raw edge, and press.

Trim the loose zipper end again, about 1/4" (6 mm) above where you stopped the zipper stitching.

Fold the waistband facing down over the zipper and pin in place. Now the waistband end should be in line with the fly edge/center front. Topstitch the end of the waistband facing to secure.


Pin the rest of the waistband in place along the entire length from the interior of the garment.
Topstitch the waistband to the front leg and side panel 2 ¼" (5.7 cm) from the top of the waist (Use the folded edge of the waistband as your guide) and continue across the end at the top of the fly. Stop the topstitching at the back edge of the side leg panel (do not continue to back waist yet).
NOTE: this step is easier to do from the interior of the garment to make sure you catch the entire edge of the waistband in topstitching. However, if your machine does not create a suitable stitch finish on the bobbin side, this step can be done from the exterior instead.


