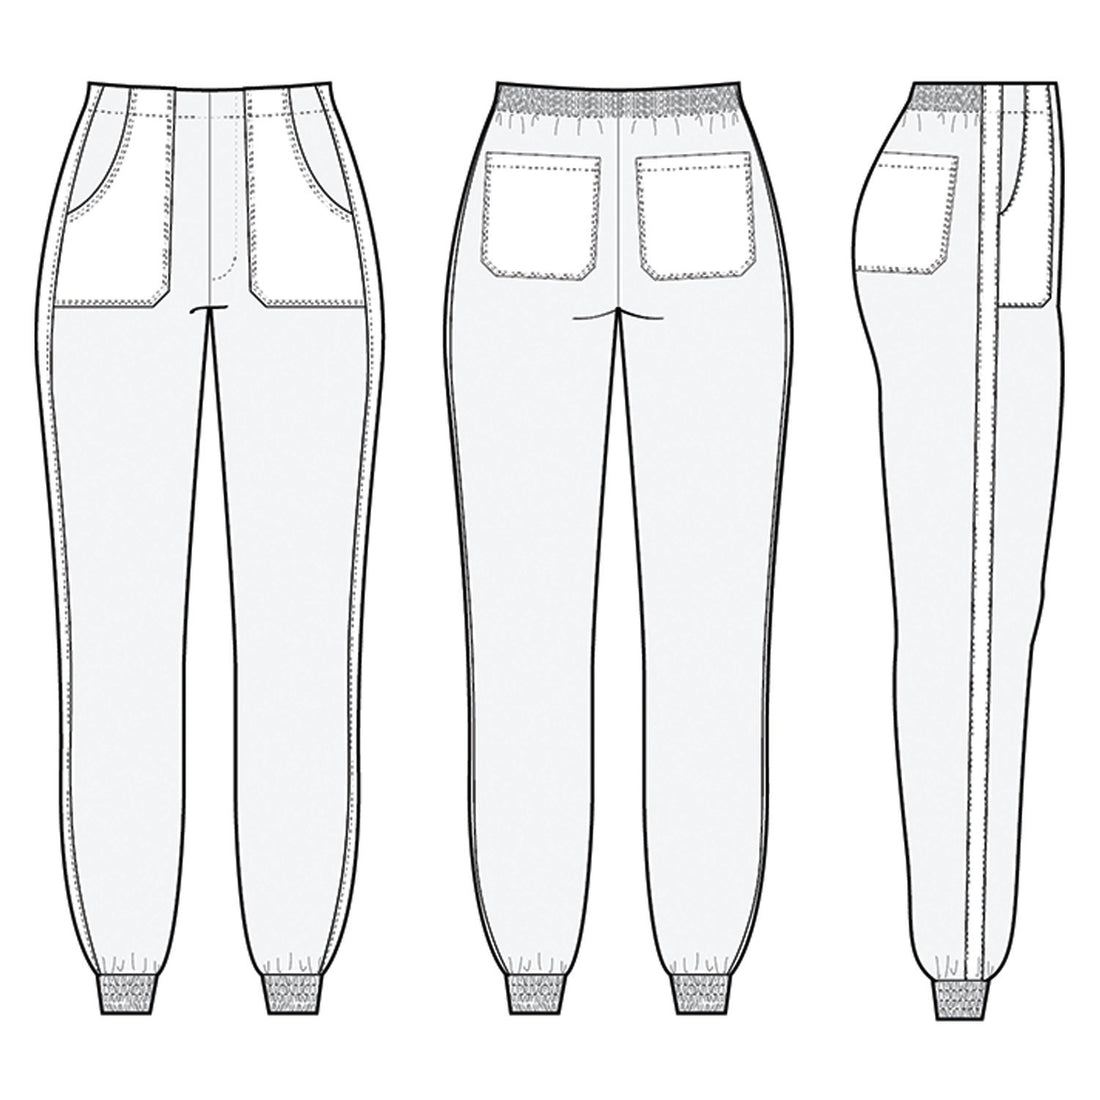
Nellie Joggers + Shorts: Sizing, Muslins, and Common Fit Adjustments for Pants Sewing
Making a pair of custom fit pants is a rite of passage when it comes to sewing your own wardrobe. It feels really daunting at first (especially when you throw in a fly front!). But once you figure out what fitting adjustments work for your body, you'll be set.
This post is specific to the Nellie Joggers and you can find the Nellie Joggers + Shorts PDF Sewing pattern here (but all of this information can be applied to most pants patterns).
TABLE OF CONTENTS
(Click to jump to each section)
Common fit adjustments:
- General lengthening and shortening of the pattern
- Pants too tight or too loose
- Crotch too high (or too low)
- Camel toe (crotch curve too shallow)
- Bubbling or excess fabric at the front crotch (crotch curve too deep)
- Pulling and "smile lines" at the crotch (front or back)
- Excess fabric at legs near crotch
- Full tummy adjustment
- Baggy legs beneath the derriere
- Full seat adjustment
- Flat seat adjustment
- Low seat adjustment
- Swayback adjustment
- Excess fabric at center back seam near waist
- Lower leg adjustments
Now I'm about to preach atcha...
It's rare that I've had a pair of pants fit me perfectly right out of the package, especially when working with non-stretch wovens and fitted styles. There is usually some adjustment needed and I go into each pants project with that in mind.
The best advice I can give for making your own pants (that fit) is to make a muslin and make gradual, small fit adjustments, one at a time. Pick ONE issue to address with each adjustment. And slowly build on that analysis. You may end up needing several adjustments (you may not need any!), but it can be overwhelming and confusing to do too many adjustments at once. This advice is coming from my own experience of crying over fit adjustments and trying to move too fast and furious!
In my experience, the adjustments that make the biggest impact on fit will happen at the crotch of the pants. Luckily, these adjustments are EASY and can totally transform the fit of your pants with minimal tweaking.
Also? Relax! We sewists are a wiley pack of perfectionists. I get it. You want to nail the fit of pants. It takes some practice...and it also takes a little bit of go-easy-on-yourself and a healthy dose of well-managed expectations. Your biggest goal, IMO, is to find a fit that FEELS good and lets you be confident in your handmade pants (If you've fit them to the point that they only work when standing still with feet shoulder width apart? You've gone too far!). The adjustments I am laying out here are a starting point to get you to a decent fit and very approachable. However...
Buckle up, because this is a long post! But hopefully you'll find it helpful. You got this! :)
First, select your size
The Nellie Joggers are available in U.S. sizes 0 to 30 (up to 48" waist and 60" hip). Select your size based on your body measurements in the Size Chart below. A Finished Garment Measurements chart is also provided in the pattern. However, I recommend that you use the Size Chart to select your size and NOT the Garment Measurement chart, as that is there to let you know how much ease is in the pattern. I'd recommend sticking to the Size Chart recommendations before getting too caught up in the Finished Garment Measurements unless you are more experienced with pants sewing.

Grading between sizes
If you are between sizes, say a size 12 waist and size 14 hips, you will need to grade between sizes. It is common to have body measurements that reflect multiple sizes. To do this, simply find both sizes on the pattern and draw a new line to connect them, smoothing the line to create a smooth edge.

When grading between sizes, be sure to also grade corresponding pattern pieces (i.e. both front and back legs along the side seam and inseam, and grade the waistband facings). Once you have the new lines drafted, you can trim away the parts that you do not need.
I recommend grading between the waist and hips if needed, and not worrying too much about grading the lower legs at this point. Keep it as simple as possible when starting out, as there are some adjustments--like slimming the legs--that can be made as you go.
Make a muslin
Just do it, ok? Make the muslin. All you need to complete a quick muslin are the Front Leg, Back Leg and Side Leg Panel pattern pieces. You can also construct a rough zip fly and install non-interfaced waistband facings with temporary back elastic basted in, but those are not absolutely crucial to assess the fit in the hips and crotch.
It's also recommended that you baste all of your seams on the muslin so you can remove the stitching and adjust seam allowances easily.
You can pick up inexpensive muslin fabric at the fabric store, or hit up the thrift store (or your linen closet?) for old sheets to use for fabric. The muslin ain't supposed to be pretty! You just want to get the most basic garment construction that you can slip on and off easily for quick fitting adjustments.
Common fit adjustments
The most helpful resource for me has been the ever-popular book, Pants for Real People. It's popular for a reason! There are several illustrated fitting assessments, as well as several case studies with photographs on women with different body types and fitting needs. There are also a few fitting strategies laid out in the book Patternmaking for Fashion Design, which is pretty much my patternmaking BIBLE. But kind of a hefty purchase if you are not interested in patternmaking.
There are a lot of fitting resources online, but I have found them to be a little overwhelming because they are often presented on a personal sewing blog in which the author is obsessing over fit and making loads of adjustments tailored to their body, which may be totally different than my own needs. The fitting rabbithole struggle is REAL, y'all. I'll say it again: keep it simple when starting out and try not to let another person's fit journey overwhelm you.
Another fabulous resource in the sewing community is Michele Matsumoto of @winmichle on Instagram. She posts regular fitting tutorials and was also a tester for the Nellie Joggers pattern and was a huge help when it came to making fit assessments during testing.
Let's dig in!
General lengthening and shortening of the pattern

Lengthen/shorten lines are provided on the front and back leg pattern pieces should you need to adjust the pattern length for your individual height. Cut along these lines to separate the pattern into two pieces, then shift them apart or together.
Make sure to shift the pieces straight up or down along the grainline to maintain the proper proportions and overall shape of the pattern pieces. Once your pieces have been shifted the desired amount, tape them back together and draft new lines to connect the pieces smoothly at the edges.
Also make sure to lengthen/shorten corresponding pattern pieces, like the fly interfacing, fly shield, and side leg panel. You may also want to lengthen or shorten the pockets and pocket facings, but this is up to personal preference and will not affect the fit of the garment.
Pants too tight...

Or, pants too loose

Try reducing or increasing the seam allowance at the side seam or adjusting to a different size. One thing to keep in mind: since the side seam attaches to the Side Panel pattern piece, you'll need to only reduce or increase on the front and back leg pattern pieces in order to maintain the consistent width of the side panel.
Crotch too high (or too low)

If you feel the urge to tug the pants down away from your crotch, try dropping the crotch point a little (this can be easily tested by increasing the seam allowance there).
Alternately, you may need to increase the crotch depth if you feel like you need even more room. Cut and spread the pattern at the lengthen/shorten line indicated at the top of the leg pattern pieces. Make a note of where the waist hits when you wear the pants, then tug them down to a comfortable place at the crotch and record the difference. This is how much to adjust the crotch depth.
Similarly, you can shorten the crotch depth if you feel that the crotch sits too low. Pinch out the excess fabric horizontally and record how much depth is removed before adjusting the pattern pieces.
Camel toe (crotch curve too shallow)

This issue is less common in loose fitting pants, but if you do experience this, you can adjust the front crotch curve to be slightly curvier, which adds a little extra length to the crotch.
Bubbling or excess fabric at the front crotch (crotch curve too deep)

If you are finding excess fabric and bubbling at the front crotch, you can make the front crotch curve a little more shallow here.
Pulling and "smile lines" at the crotch (front or back)
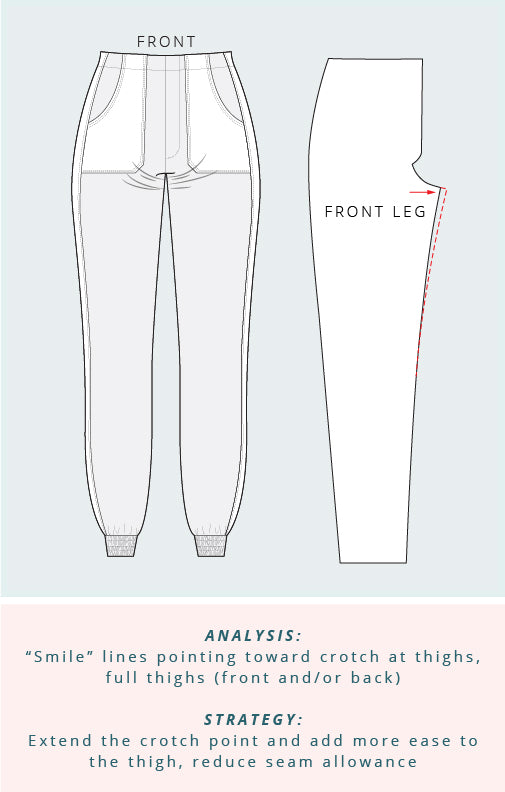
You may have fuller thighs that require a bit more ease in this area. Increase the crotch length by reducing the seam allowance at the crotch point on the pants legs. Do this in small increments to start (about 1/4" (~6 mm) at a time).
Excess fabric at legs near crotch

You may have thinner thighs and require a little less ease in this area. Decrease the crotch length by increasing the seam allowance at the crotch point on the legs.
Full tummy adjustment

If you are fuller through the abdomen and find that the midsection feels too tight, a full tummy adjustment might help. Pull the pants downward at the center front until the wrinkles smooth and add length to the center front to increase the fabric around the tummy.
You can also slash and spread the pattern to make this adjustment, as shown above.
Alternately, one of the testerssuggested this blog post from Itch to Stitch that she found helpful for fitting a fuller tummy. It involves a modified body measurement that helps in selecting a size to fit the abdomen more comfortably.
Baggy legs beneath the derriere

If you find that the front fits and hangs well and the crotch and waist feel ok on front and back, but the back leg is baggy underneath your bum, try increasing the seam allowance at the inseam on the back leg only (curving back to the crotch point to maintain the crotch length).
You may also want to try a combo of a back crotch depth increase and a low seat adjustment if the inseam trick doesn't do it (this is illustrated in more detail in the book Pants for Real People, which I highly recommend checking out if your fitting needs are more nuanced).
Full seat adjustment

If the pants are tight in the derriere but seem to fit well elsewhere, a full seat adjustment can help. This can be accomplished by doing one or a combo of the following pattern tweaks:
- Increase the crotch length by lengthening the center back curve at the waist or crotch point.
- Re-draft the back crotch curve to be slightly more curved and increase the side seam (by bringing this curve in, you will be reducing the width/circumference of the pants in this area, so adding to the side seam is necessary).
Flat seat adjustment
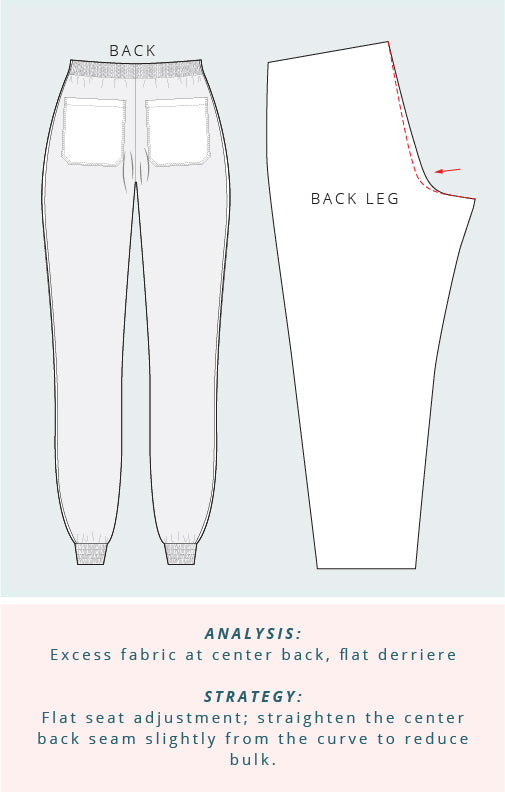
If you don't have as much volume in the derriere, you may notice fabric bagging or bubbling near the center back seam. Try straightening the back curve to remove a little fabric in that region.
Low seat adjustment

If the front crotch and waist fit well, but your pants are tugging/bunching around the crotch near the bum, you might benefit from a low seat adjustment. Adjust the back crotch curve downward, blending back to the crotch point and waist.
Swayback adjustment

If you have a full bum and smaller back waist (a swayback), you may notice that your pants bunch in the back at the waist. You can either pinch out the excess or tug the waist up and record the amount of excess, then adjust the center back accordingly.
Excess fabric at center back seam near waist

If the back waist feels a little big at the center back, causing folds of excess fabric, increase the seam allowance and blend to the center back seam.
Lower leg adjustments


Fullness or tightness in the lower thighs, knees, and calves can be easily address by reducing or increasing the seam allowance on both the sides seams and inseams. I recommend dividing these adjustments equally on the side seam and inseam. You'll also want to keep the new lines as smooth as possible, avoiding jogging back and forth between multiple sizes.
If you made it this far, pour yourself a stiff drink and pat yourself on the back! And thanks for reading!
That's all I got for now, but I highly, HIGHLY recommend picking up a copy of Pants for Real People, as it goes into greater detail with these and other fit adjustments for pants (the authors also have a book called Fit for Real People, and I can only assume it is equally useful!). (not affiliate links)
And be sure to check out the full Nellie Joggers + Shorts Sewalong for all the tutorials on constructing your pants.