Making a Jasika Blazer, Part 1: Getting Started!
It’s no secret that I love Closet Case Patterns (don’t even get me started on my Ginger Jeans that I wear more times each week than I am comfortable admitting…)
So when Closet Case announced the release of the Jasika Blazer, I knew it would end up in my queue.
Seeing the blazers popping up on Instagram has made me so excited to make my own. I especially loved Tessa’s (of @sewspoke on Instagram)! It is fitted and modern with a few details that really elevate the style. Judith Dee of @judithdeecreations was another fave…the tailoring and shape of her blazer is PERFECT! And I like that she went with the welt pockets—I plan to do the same. You can search #jasikablazer and #blazerofglory for all sorts of inspiration from the sewing community. Prepare yo’self for the rabbit hole!
Printing the pattern
My first step was to buy the pattern (I went with a PDF) and had it printed with pdfplotting.com. The order total, including shipping, was $15.33 for 8 printed sheets (I also printed a few copies of the Luna Crossbody pattern to meet the order minimum—half were 36x48 inches for the Jasika, and the rest were 24x36 inches for the Luna). This was my first time using this service and the shipping was lightning fast! My prints shipped the same day and arrived in two business days. I’ll definitely be using this service again.


Researching blazer styling + buying fabric samples
I’ve been searching for and pinning blazers on Pinterest since before the Jasika was released (this pattern was an answer to my blazer prayers!). Below are a few examples of the looks I loved the most for ready to wear blazers with a slim, fitted style. I have a board dedicated to my handmade wardrobe inspiration and anticipated projects.

1: Casual day look, 2: Contrast collar inspiration, 3: Business causal with an edge, 4: Travel uniform, 5: Lunch meeting
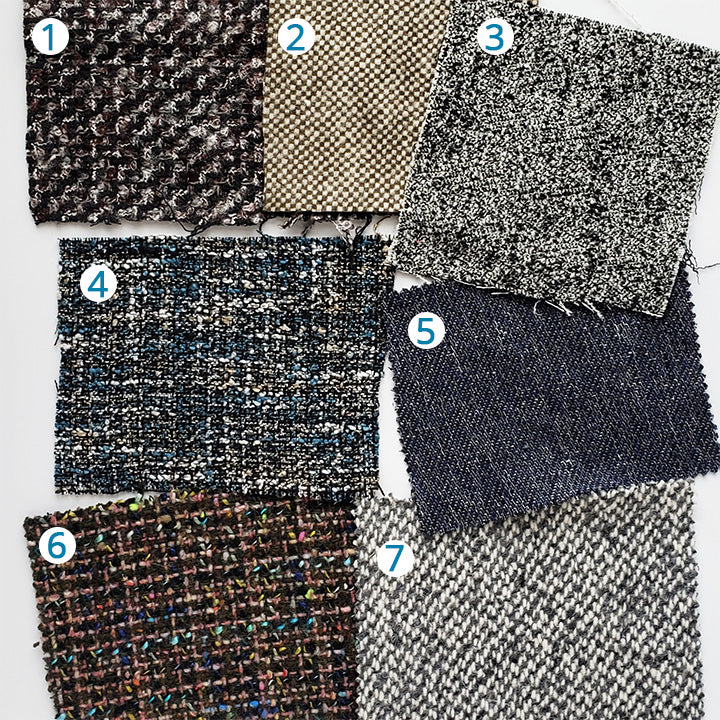
My go-to for coating fabrics has been moodfabrics.com. I bought the fabric for my yellow Clare Coat from Mood and was really happy with it. For the Jasika, I ordered 7 samples of tweed—I wanted something textural and sophisticated that could also be dressed down for a more on-the-go casual look.
I loved the textures and colors in pretty much ALL of these! But my favorites were number 6 and number 7. Number 3 , 4, and 5 were also beautiful, but a bit on the thin side (and a commenter on Instagram noted that they had tried number 3 for a jacket with not great results because of its thin, drapey hand…good to know!).
After much internal, type-a debate, I decided to go with number 7, the Gray Woolen Tweed. It was so easy for me to visualize this fabric in my wardrobe and fantasize about all the outfits I could put together with it for spring and fall weather. Visualization is key for me with any creative project!
Next up: making a muslin!
While I wait for fabric to arrive, I’ll be working on my muslin—this process intimidates me JUST A LITTLE BIT! I’m not sure why. So stay tuned! In my next post in this series, I’ll be sharing that process.
You can subscribe to the RSS feed for blog posts by clicking ‘BLOG RSS’ below, and you can join my email list for periodic updates on blog posts and new products by clicking here.

