Bias Binding Tips for Smooth Installation
The Hana Tank + Dress Pattern features the bias binding method of finishing the neckline and armholes. While this method is a great scrap buster, the first few times you try it might be frustrating. It takes practice and a little patience to make sure all those seams lay flat with no puckering.


Well, today I am here to help! During the testing phase for the Hana pattern, a few of my testers had great feedback for getting a beautiful finish with bias tape binding.
If you’re still not into it, check out this tutorial for making a facing instead!
First things first:
You actually don’t have to make your own bias tape at all.
Many fabric stores keep it in stock and you can also find a wide array of pre-made (and quite beautiful) bias tapes online. Etsy is a great resource for this! You’ll need about 3 yards for the Hana pattern. Just make sure you bias tape is similar in weight and behavior to your main project fabric.
But making it yourself is pretty easy and fun once you get the hang of it!
Making bias tape is a great way to bust some scraps! Whether you are trying to squeeze a lot out of your project fabric, or want to make a contrasting bias tape, you can piece together multiple smaller strips of fabric pretty easily to make good use of some of those otherwise unusable scraps you have laying around.
The Hana pattern has a pattern piece for cutting bias tape, but you don’t have to cut your sections that long at all. With piecing, you can connect multiple, much smaller pieces together pretty easily!
In this post I’ll lay it out step-by-step (with LOTS of photos!)…
STEP 1: Cut fabric strips on the bias
Cutting “on the bias” just means cutting it at a 45 degree angle to the grain of the fabric. If you have small pieces of fabric, you can make quick work of laying them out on a cutting mat and cutting them down with a straight edge and a rotary cutter.
For larger pieces of fabric, lay it out flat, then fold up one corner to make a 45 degree fold (as if you are folding a perfect square on the diagonal). Then rotate the folded fabric so that the folded edge is parallel to your cutting mat rulers. Using your straight edge and rotary cutter, cut perpendicular (90 degrees) to the folded edge to create your strips.


STEP 2: Piece short strips together at ends if you need longer strips
Lay one piece right side up with the end straight up and down. Then lay the end of the next piece on top of the first piece so right sides are facing. Sew the ends together at a diagonal.


Unfold the strip and press the seam open to create one continuous, straight piece. Trim the seam at the sides for a neat edge.


STEP 3: Stretch the bias tape!
Yep, you stretch it. I never knew this until this pattern test, but it actually works really well to pre-stretch the tape. Who knew!?
Using lots of heat and steam, begin ironing the strip of fabric while pulling it away from your iron as you go. You’ll notice that your tape will become more narrow with the stretching. You can do a test piece when cutting to make sure the stretched width is appropriate for your project. Wait for the fabric to cool before moving it.


STEP 4: Fold the edges
If you’ve ever been turned off at the thought of making your own bias tape, I’m about to change your mind: Get yourself a bias tape maker! This little inexpensive tool makes bias tape-making a total breeze (and it’s actually quite satisfying).
If you don’t have one, you can still make bias tape. You’ll just have to manually fold and press the edges in, which takes a little longer but works just fine, too.
With your fabric strip and bias tape maker face down, thread one end through the large end of the bias tape maker channel (you may need to use a pin or the tip of your seam ripper to help it through). It will come out the other end with the two edges folded up. Only pull it through about an inch and press the end to hold the folds.


Flip everything over so the the folds are now face down and the bias tape maker is right side up. Continue pressing the folded tape and gently pulling the bias tape maker to the left. Keep the tip of your iron close to the tool as you pull. Continue until you’ve pulled the entire strip through the tool. Voila! Satisfying, right?


STEP 5: Pre-curve your bias tape
Some prefer to do this step prior to folding the tape, but I like doing it after to keep the edge folds consistent. Either way, curving the bias tape is possibly the most crucial step in getting a nice finish (learned this from Jenn of @msjennmakes, who taught me a lot on this subject during testing!).
Once again, using a fair amount of heat and steam, press the tape as you pull it in a curved direction. I like to compare my curves to the curve of the armholes and neckline periodically to make sure I am getting enough curve in there!


Let it cool before moving it.
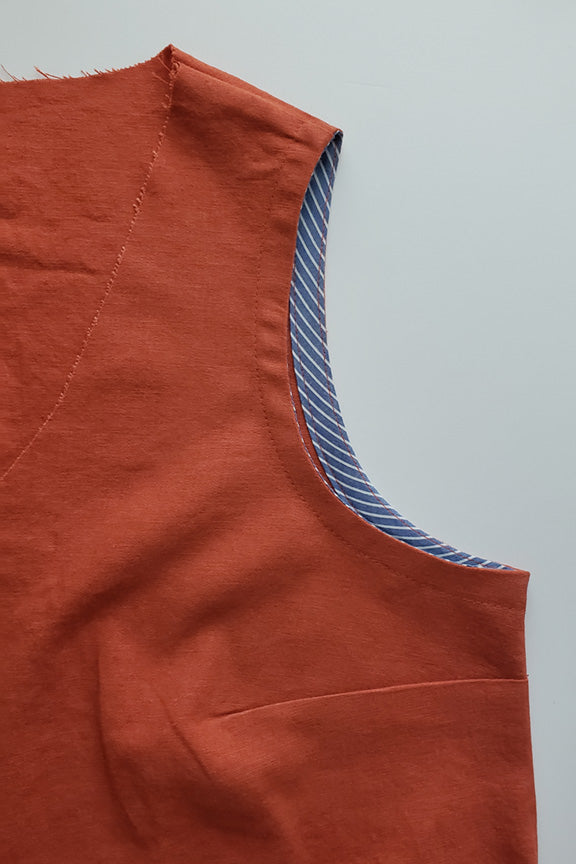
STEP 6: Attach the bias tape to the armholes
For the armholes, pin the bias tape in place about 1” from the side seam at the bottom, with about 1” to 2” of extra bias tape extending past the seam. You also want to make sure you are maintaining the correct seam allowance (I made a 1/2” bias tape with 1/4” folds. My armhole and neckline seam allowance is 3/8” so I offset the edge of the tape roughly 1/8” from the raw edge of the armhole here). You’ll use the fold of the bias tape as a guide for your seam.


You can pin this in place if you like, but I like to sew with out pins, positioning the bias tape as I go. As you do this, remember to “observe the curve” (sage wisdom form another tester, Olivia of @shaftedpin). Try to go slowly and rotate the curves under the needle without stretching the fabric or bias tape as you go. Sew the bias tape around the perimeter, using the bias tape fold as a seam allowance guide. Stop about 1” from your starting point.


Trim your bias tape, again with about 1 to 2” overlapping the side seam at the bottom of the armhole. Fold each of the raw ends backward, with their folds touching each other. Then, use the folds as a seam guide. Pin the ends together and sew them together along the fold lines.


Flatten the folds and sew the rest of the bias tape to the armhole, closing the gap.


STEP 7: Understitch the bias tape to the armhole
Press the bias tape up/away from the armhole to lay on top of the seam allowance (you can also trim the seam allowance back if you have little strings poking out). Understitch the bias tape to the seam allowance around the entire perimeter, keeping your stitch very close to the seam.


STEP 8: Finish the bias tape with topstitching
Press the bias tape to the interior, keeping the edge neatly folded under. Topstitch the bias tape in place around the perimeter of the armhole, keeping the stitch close to the edge. I find this is easier to do from the wrong side of the garment. And remember to “observe the curve” by guiding the armhole under the needle in a curved motion without stretching the fabric.


Armhole: Done! Repeat for the opposite side.

STEP 9: Install bias tape to neckline
Use the same techniques to install the neckline binding, this time starting at the point of the v-neck (the pattern includes a mark point to indicate the start and stop location). Leave approximately 1” to 2” of bias tape past that point. Sew all the way around the perimeter of the neckline.


When you reach the starting point at the point of the v-neck, fold the edge of the bias tape in where you started. Then overlap the end of the bias tape over it, and continuing sewing until you reach the exact point where you started. This should be right at the edge of the bias fold underneath.


Clip the v-neck point to make it easier to turn the bias tape to the interior.


STEP 10: Understitch the bias tape to the neckline
Press the bias tape up/away from the neckline to lay on top of the seam allowance. Understitch the bias tape to the seam allowance around the entire perimeter, keeping your stitch very close to the seam. Be careful not to sew over the overlapping ends at the v-neck point.


STEP 11: Finish the neckline with topstitching
Just as you did at the armholes, press the bias tape to the interior and topstitch to secure. When you reach the point of the v-neck, overlap the bias tape and fold one end over the other and press for a neat finish (I like to pin this fold in place to secure it while I topstitch the neckline).


Finished!
Give your Hana a good pressing and admire your work!

